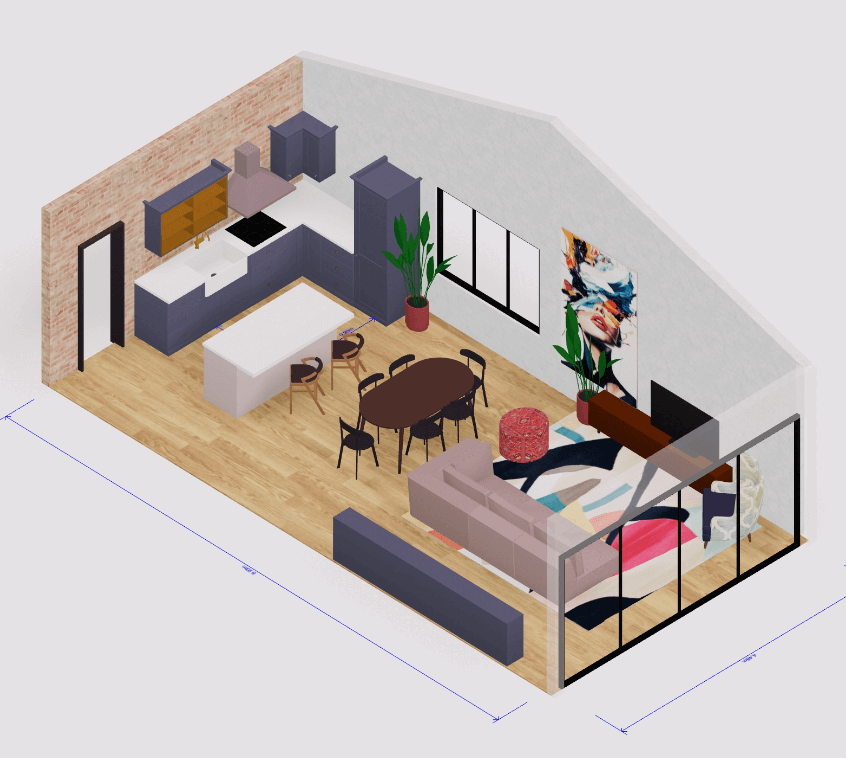
Planning a kitchen remodel is an exciting opportunity to reimagine one of the most important spaces in your home. Instead of relying on rough sketches or mental guesses, you can now digitally design your kitchen in 3D before any construction begins. Modern tools like Arcadium 3D make it possible to create a realistic kitchen plan on your computer, allowing you to experiment with layouts, colors, and fixtures in a virtual model of your space.
This step-by-step guide, written from a kitchen designer’s perspective, will show you how to plan your kitchen remodel online using Arcadium’s 3D design platform, from initial layout to final touches. By the end, you’ll see how anyone – from homeowners to professional designers and contractors – can transform a kitchen design using a
free kitchen design tool online
by Arcadium 3D.
Why use a 3D design tool for your kitchen remodel?
Simply put, it gives you control and clarity. A digital 3D model lets you visualize every inch of your future kitchen long before you commit to costly materials or labor. You can spot design issues early, try out different configurations, and ensure both form and function are optimized.
This not only reduces the risk of expensive mistakes, but also helps you make informed decisions about what works best for your needs. Moreover, a well-planned kitchen can boost your home’s value and improve daily life – the kitchen’s design has a direct effect on resale value and is one of the most important factors for buyers.
Even if you’re not selling, a thoughtfully designed kitchen layout minimizes unnecessary movement (think fewer steps between the stove, sink, and fridge), saving you time and energy every day. In short, planning virtually is a smart move whether you’re a DIY remodeler or an industry professional.
Why Plan Your Kitchen Remodel with a 3D Tool?
Remodeling a kitchen used to involve paging through catalogs and making pencil sketches. Today, 3D design tools have revolutionized kitchen planning. By embracing digital planning, you unlock several key benefits:
Visualize Before You Build:
With a 3D model, you can virtually walk through your new kitchen and view it from every angle. This instant realism means you see how different countertop materials look next to your cabinet colors, or how an island fits into the space, before you buy or install anything. It’s like test-driving your kitchen design in advance, ensuring everything is to your liking.
Optimize Space and Workflow:
Every kitchen has unique spatial challenges. A 3D tool helps you make the most of your space by letting you easily rearrange cabinets, appliances, and islands to find the perfect layout. You can experiment with moving the fridge to a different wall or adding an extra pantry cabinet and immediately see the impact on the room’s flow. Crucially, this helps incorporate the classic “kitchen work triangle” – the efficient positioning of stove, sink, and refrigerator – to minimize walking distance and save time during meal prep. Less walking and fewer awkward turns mean faster, easier cooking.
Catch Issues and Save Money:
A digital design lets you catch potential issues (like a refrigerator door hitting a wall, or insufficient clearance for a cabinet drawer) early in the process. By adjusting your plan in the software, you avoid the trial-and-error costs of making changes during construction. In other words, you can perfect your design virtually, which is far cheaper and simpler than moving plumbing or wiring after the fact. This kind of cost-effective planning means fewer surprises and change orders once the remodel starts.
Collaborate and Refine Ideas:
A 3D kitchen model becomes a universal language for everyone involved in the project. Homeowners, designers, and contractors can all look at the same 3D plan and clearly understand the vision. This makes it easier to share ideas and get feedback – far better than trying to interpret 2D blueprints or verbal descriptions. With an online tool, you can even share a link to the design so others can view (or interact with) the model in their web browser, facilitating quick feedback and collaborative tweaking in real time.
In summary, planning your kitchen remodel with a 3D tool marries creativity with practicality. You get the freedom to explore ideas in a risk-free virtual environment, while ensuring the final plan is functional, beautiful, and within budget. Now, let’s look at how to do this step by step using Arcadium 3D’s online design platform.
Check Out Our Tool
Step-by-Step Guide: Designing Your Kitchen with Arcadium 3D
Designing a kitchen in Arcadium 3D involves a series of logical steps. We will go through each phase of the process – from mapping out your room’s dimensions to adding the final decor touches. Whether you’re a homeowner doing this for the first time or a contractor translating a client’s ideas into a plan, these steps will guide you through creating a complete kitchen design.
Step 1: Outline Your Kitchen Layout (Walls, Doors, and Windows)
Every great kitchen design starts with an accurate floor plan. In Arcadium 3D, begin by mapping out the shape of your kitchen in the 2D view (think of it as drawing your floor plan). Use the wall-drawing tool to trace the outline of the room: click to create each wall segment and corner, and close the shape when done.
If your kitchen is a simple rectangle, this is quick; if it has an L-shape or other nooks, add additional points to capture those. You can enter exact wall lengths for precision – for example, if one wall is 12’4” long, type that in so the software reflects it exactly. Don’t worry if your measurements aren’t perfect at first; you can adjust dimensions as you go.
Next, place windows and doors in the layout where they exist (or where you plan to have them). Arcadium provides openings you can drag onto the walls, then slide them to the correct position. As you move a window along a wall, guidelines and dimension readouts will help position it precisely (e.g., centering a window or leaving enough space at wall ends).
Properly positioning doors is important too, since a door swing might affect where you can put cabinets or appliances. At this stage, you’re essentially creating the “canvas” on which your kitchen design will live – the room’s boundaries and openings.
After laying out walls and openings, switch to the 3D or first-person view to get a sense of the space volume. Arcadium lets you jump into a virtual walk-through even with just the walls up. This is a good time to verify things like window placements (does the window look centered on the wall when you’re “inside” the room?) and door clearance (will that back door swing into where the fridge might go?).
Taking an early 3D tour of the empty room can reveal if any dimensions feel off or if any adjustments are needed before you add kitchen fixtures. Once satisfied that your digital room matches your actual (or planned) kitchen dimensions, you’re ready for the next step.
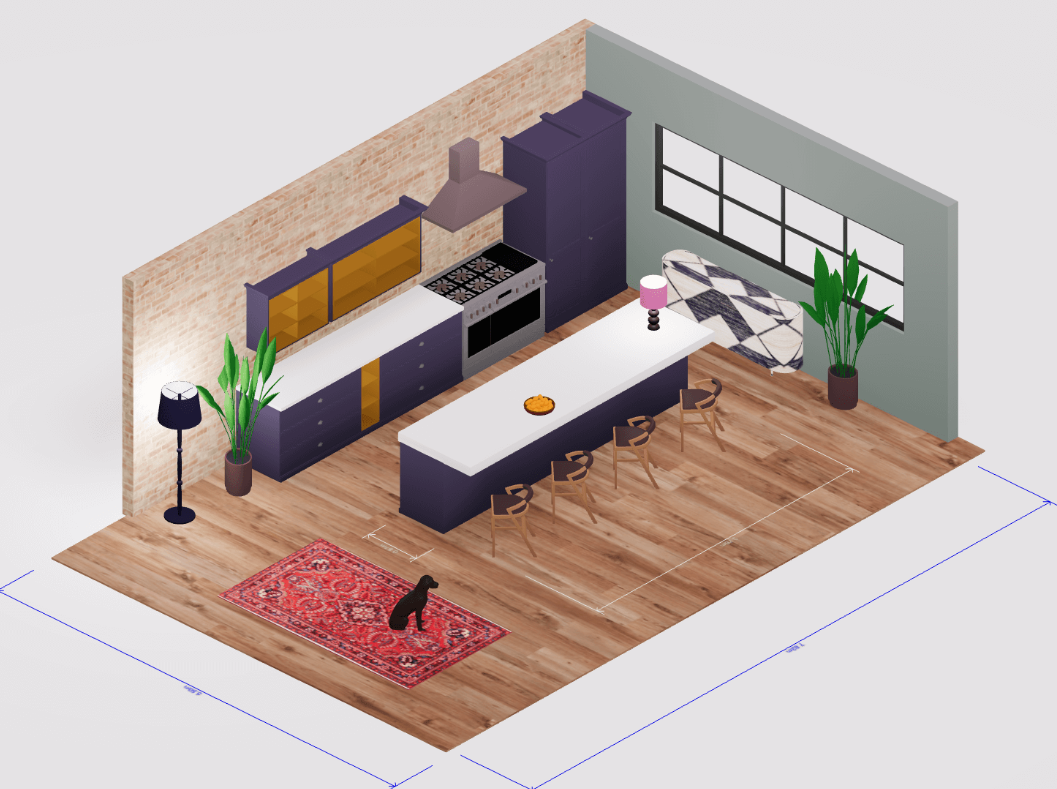
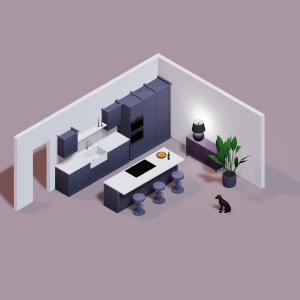
Step 2: Place Cabinets, Appliances, and Fixtures
With the room outline in place, it’s time to bring in the core components of your kitchen. This step is about laying out all the major fixtures: base cabinets, wall cabinets, pantry units, countertops, appliances (stove, refrigerator, dishwasher, etc.), and key fixtures like the sink. Arcadium 3D makes this easy by providing a library of pre-built kitchen units and appliances you can simply drag and drop into your model.
Start with the base cabinets and countertops, since they often define the kitchen’s workflow. Using Arcadium’s Kitchen library, select the type of cabinets you want (for example, a 36” sink base, a corner cabinet, a bank of drawers, etc.) and place them along the walls where needed. The cabinets will snap against walls and each other neatly, but you can fine-tune their position if necessary.
Thanks to Arcadium’s dynamic components, you can also easily resize cabinets to fill a specific length – if you need a slightly narrower cabinet to fill a 33” gap, just stretch it and the doors/drawers will adjust automatically. Continue placing base cabinets in the layout according to your kitchen plan (remember to leave space for appliances).
Next, drop in the appliances. Common appliances like refrigerators, ovens, cooktops, and dishwashers are available in the library. Position the refrigerator where it makes sense (often at one end of the cabinetry run or in a corner). Place the range or cooktop, ensuring it’s centered where you want and has appropriate space on either side for countertops.
Insert the sink into the sink-base cabinet you placed (Arcadium may have a combined sink+cabinet unit or you add a sink object onto a countertop cutout). As you position these, think about the “work triangle” – ideally the path between sink, stove, and fridge is unobstructed and not too large or too small.
Arcadium’s grid and measurement display can help check these distances. Also, be mindful of clearances: for example, leave enough room for the refrigerator door to open fully without hitting an island or opposite counter. In the 3D view, you can simulate opening appliance doors to check this (Arcadium’s components often include door swing visuals or you can eyeball the space).
Don’t forget wall cabinets and tall pantry units. These go above your counters and in any floor-to-ceiling spots. Drag wall cabinets from the library and position them at the appropriate height (Arcadium likely auto-places them at standard height, e.g., 54” above floor, but you can adjust vertically).
You might have double-stacked cabinets to the ceiling or open shelves – whatever your design calls for, place those now. If your kitchen has an island or peninsula, add base cabinets to form that as well, and consider spacing for seating if it’s a breakfast bar. As you add all these elements, frequently toggle between 2D and 3D views. In 2D, ensure the layout looks balanced and nothing overlaps improperly.
In 3D, ensure the space feels comfortable – open Arcadium’s first-person mode and “walk” between the island and counter to confirm there’s enough clearance for people to move freely (a rule of thumb is about 3 feet or more of walkway).
By the end of Step 2, you should have all the big pieces in place, essentially creating a rough layout of your kitchen. The room will now look like a kitchen, albeit an unfinished one: you’ll see cabinets in place, appliances where they belong, and an overall floor plan taking shape. This sets the stage for the next steps, where we’ll fine-tune details and add realism.
Step 3: Add Countertops and Custom Elements
Now that the main components are positioned, it’s time to add countertops and any custom architectural elements. In many cases, Arcadium 3D’s cabinet pieces might already include generic countertops. If so, you can edit those to the material or color you want.
If not, or if you need to create a unique countertop shape (for example, a peninsula with a curve, or an L-shaped counter that wasn’t covered by standard pieces), you can use Arcadium’s shapes or drawing tools to craft them.
The software likely has a “worktop” object you can drag out and stretch to size, or a custom shape tool where you draw the outline of a counter. Ensure the counters cover all base cabinets and have the correct overhang (e.g., 1” over the cabinet edges, or a 12” overhang on the island for a bar seating area).
“Custom elements” might include any features that aren’t pre-made in the library. For instance, if you want a decorative range hood cover, a bulkhead, or an unconventional island shape, Arcadium’s modeling tools can help. Often, you can repurpose basic shapes (like boxes, cylinders) to represent these and then apply materials to them.
Arcadium’s shapes tool lets you add things like partial walls or columns too. As a professional designer, you might appreciate this flexibility – you’re not limited to the stock components. If the client wants a built-in breakfast nook, you could construct a bench by resizing a cube shape, for example.
This is also a good stage to incorporate any architectural details of the space into the model. Does your kitchen have a soffit or beam running across the ceiling? If yes, add that using a simple rectangular shape so that you remember its presence (and ensure your tall cabinets or new fixtures don’t clash with it).
If there’s a window sill or an archway, include those details. Arcadium 3D allows fairly detailed editing, so you can account for these real-world conditions. Professional contractors using the model will appreciate seeing these elements in the plan.
While adding these custom features, continue to refine placement. Align countertops so their seams or joins are where you want them (Arcadium has alignment tools to snap things neatly in line). Check that corners meet properly and that your island is centered if it’s meant to be. Little adjustments like nudging an island 2 inches for perfect symmetry can be done with precise input. The ability to work to exact measurements is one reason Arcadium 3D is favored by pros, since you can be confident the digital plan can translate to the real world accurately.
By the end of this step, your kitchen model will have all its fundamental pieces: walls and openings from Step 1, cabinets and appliances from Step 2, and now countertops and any custom additions from Step 3. The layout should be fully fleshed out and functional. Next, we’ll make it shine with lighting and finishes.
Step 4: Apply Lighting and Test the Atmosphere
Lighting can make or break a kitchen’s ambiance and usability. In Arcadium 3D, you have the ability to add and adjust light sources to simulate how your kitchen will feel at different times of day or with different fixtures. This step is about ensuring your design isn’t just functionally correct, but also warmly illuminated and welcoming.
Start by placing light fixtures from Arcadium’s library. Typical kitchen lighting elements include overhead ceiling lights, pendant lights (commonly over an island or dining peninsula), under-cabinet lights, and perhaps recessed spotlights. Drag and drop lights into the model where needed: for instance, position a row of pendant lamps above the island, or place a ceiling light in the center of the room.
Arcadium likely provides basic lighting objects that you can move in the 3D view to the correct height (e.g., hang pendants at the desired distance from the counter). You might also have floor lamps or wall sconces if your design calls for accent lighting in adjacent breakfast areas, etc.
Once the fixtures are placed, use Arcadium’s lighting controls to adjust the brightness and color of each light. Many design tools allow you to set a warm light (more yellow) vs. a cool daylight tone, and to dim or brighten lights. This is incredibly useful to see, for example, if your kitchen will be bright enough with just the overhead lights or if you need under-cabinet lighting to illuminate the countertops.
Turn some lights off and on in the model to simulate different scenarios (daytime with sun through windows vs. nighttime with only interior lights). Arcadium’s real-time render engine will update the scene’s shadows and highlights as you tweak the lights. Professionals often use this to verify there are no awkward dark corners and that task areas (like the stove and sink) are well-lit.
Arcadium also likely factors in natural lighting if you have windows. You may be able to set a time of day to see sunlight angles, or at least see ambient light through the window objects. This can inform whether you might want to add a window or enlarge one, or if you’ll rely on artificial lighting during most of the day.
It’s all about creating the right mood and ensuring functionality – you don’t want any surprises like a beautiful kitchen that ends up feeling like a cave due to poor lighting. By visualizing it now, you can adjust fixture placements or types (maybe choose a chandelier with more bulbs, or add a pendant) until the balance is right.
After configuring the lights, take another virtual “walk” through the kitchen in 3D. This time, pay attention to the atmosphere. Do the pendant lights create a pleasant glow over the island? Are the countertops well-lit? Is the overall lighting even, or are there harsh shadows?
Arcadium 3D’s ability to render this on the fly is a powerful aid – it’s much better than guessing from a 2D electrical plan. As a designer or contractor, you could even use this feature to persuade a client on a lighting plan: show them the difference between soft warm lights vs. cool bright lights in the model so they can choose their preference.
By the end of Step 4, your kitchen model isn’t just a static layout – it’s a lively space with realistic lighting. This brings us very close to how the final remodeled kitchen will actually look and feel. All that’s left is to inject your personal style through colors and finishes.
Step 5: Refine Colors, Materials, and Accessories
With the layout and lighting set, the next step is to apply finishes and decorate your virtual kitchen. This is where you make the space truly yours (or perfectly tailored to your client’s taste). Arcadium 3D allows you to change materials and colors on most surfaces and to add a variety of accessory items for realism.
Begin with the cabinet finishes and colors. Perhaps you want classic white shaker cabinets, or a two-tone scheme with navy blue island cabinets contrasting the perimeter in wood grain. In Arcadium, select each cabinet (or all at once if grouping is possible) and choose a color or material from the palette. The platform might have predefined textures (like oak, walnut, painted colors, etc.) to apply.
Change the countertop material similarly – try marble vs. granite vs. quartz patterns to see what looks best. Don’t forget the floor: if your model started with a generic floor, update it to your chosen flooring (tiles, hardwood, etc.). These visual choices are instantly reflected in the 3D view, so you can judge if a certain backsplash tile pattern clashes with the countertop, or if the wall paint color complements the cabinetry. Arcadium’s wide range of adjustable materials ensures you can simulate virtually any design style, from modern minimalist to rustic farmhouse.
Next, add accessories and decor to give the kitchen a lived-in feel. While this might seem like just aesthetic fluff, it can actually help in evaluating the design. For example, placing bar stools at the island not only shows how the seating will look, but also lets you check clearance behind them. Adding a fruit bowl, cookware, or a rug can make the rendering more realistic for presentations.
Arcadium’s library likely includes items like pendant lights (which we did), faucets, cabinet handles, as well as decorative elements like plants or small appliances (toaster, kettle) to sprinkle around. These items can make your 3D kitchen feel complete and help you or a client emotionally connect with the space as a real kitchen rather than a sterile model.
As you refine details, consider cohesion and style. Ensure that all the finishes work together in a harmonious scheme – for instance, the metal finishes (faucet, appliance handles, lighting fixtures) could all be brushed nickel for consistency, or deliberately mixed in a stylish way. Check that accent colors repeat enough to tie the design together (the color of the island could echo in the backsplash tile, for instance).
Arcadium makes it easy to swap colors and materials, so you might iterate through a few schemes: try a bold color on the cabinets and if it’s too much, revert or adjust saturation. This flexibility is a boon for designers who often want to present a couple of options. In fact, you can save multiple versions of the kitchen design in Arcadium – say, “Option A: Light Cabinets, Dark Counter” and “Option B: Dark Cabinets, Light Counter” – and compare them side by side or share both with a client.
By the completion of Step 5, your 3D kitchen model should look like a picture-perfect representation of the finished remodel. It will showcase the chosen cabinets, appliances, lighting, colors, and decor in a cohesive design. The heavy lifting of design is done, and you’re ready to move on to executing the plan in real life – but first, you’ll want to share this plan and get final approvals or feedback.
Step 6: Review, Share, and Prepare for the Real Remodel
The final step is taking your polished 3D kitchen design and using it to facilitate a smooth real-world remodeling process. Arcadium 3D offers tools to review your design in detail, share it with others, and extract useful information for the build.
Start with a careful review of the 3D model on your own. Use Arcadium’s first-person walkthrough one last time and pretend you are using the kitchen: open imaginary cabinets, walk from the stove to the fridge, imagine prepping a meal on the counter. This mental simulation can reveal small tweaks – maybe you realize a corner might benefit from a carousel shelf, or a light should be moved slightly.
Because everything in Arcadium is editable, you can still make these fine adjustments now. Also, double-check measurements one more time: Arcadium allows you to measure distances in the model, so verify key clearances (like aisle widths, distance between the island and the sink, etc.) to ensure they meet design guidelines or personal comfort.
Next, share the design with stakeholders. If you’re a homeowner, this might mean sharing the model URL with your family or even showing it to a friend for a second opinion. If you’re working with a contractor or as a designer with a client, now is the time to present the final plan. Arcadium’s share feature lets others view the model in 3D from any browser without needing an account. This is incredibly useful – for instance, a contractor can literally see the design and understand the intent down to the placement of each element, reducing miscommunication. In fact, Arcadium can serve as a collaboration platform where contractors, electricians, and other team members can visualize their part of the project.
A contractor might use the model to take rough measurements or to plan the sequence of work (e.g., knowing where to run new wiring for those island pendants as per the model). Since the model can be viewed on a tablet or laptop easily, it can even be referenced on-site during the remodel.
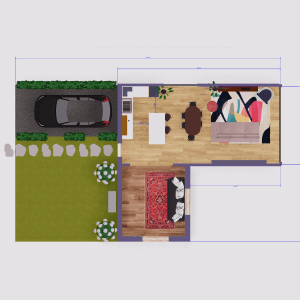
For professional designers, Arcadium 3D can generate additional outputs to help in execution. You might use the software’s ability to switch to a 2D plan or elevation view of the kitchen and print or export those. Arcadium allows you to get an overhead floor plan (complete with measurements) and even cross-section or elevation views of the walls, which can be useful to communicate technical details to builders.
These can serve as the basis for construction drawings or at least a helpful reference alongside formal plans. The fact that you can toggle from a life-like 3D view to a scaled 2D plan at will is a huge time-saver – you don’t need to redraw anything; the software generates it from your model.
Finally, use the completed design as a guide for the remodel execution. With Arcadium 3D’s model, you essentially have a detailed roadmap for transforming the virtual design into reality. The model can be consulted to answer questions like “How high was the wall cabinet above the countertop?” or “What was the intended gap between the stove and the side wall?”.
Because you’ve meticulously planned and visualized everything, you can proceed with confidence that the end result will match the vision. This also means smoother execution – with every detail planned out, contractors are less likely to run into unexpected issues or change requests mid-stream. You’ve already walked the kitchen dozens of times in virtual space; now it’s time to walk through the real space once it’s built, with the assurance that it will feel just as you intended.
At this point, congratulations – you have effectively designed and planned your kitchen remodel online from start to finish. By following these steps in Arcadium 3D, you’ve not only created a beautiful design but also set the stage for a successful renovation.
Advanced Tips for Professional Designers and Contractors
While Arcadium 3D is user-friendly for beginners, it also offers advanced capabilities that professionals can leverage to streamline their workflow:
Leverage Precision for Fit and Compliance:
As a pro, you may have to adhere to design standards or fit designs to exact site measurements. Use Arcadium’s precise input to make sure, for example, that you maintain required aisle widths (like the NKBA-recommended 42 inches in an open-aisle kitchen) or clearance around appliances. You can trust the model’s dimensions because you’ve entered them accurately – this helps when double-checking things like that a new refrigerator will fit into an existing alcove perfectly. If you’re designing for a client, showing that your plan respects all the functional clearance standards builds confidence.
Utilize Versioning for Options:
Clients often want to see alternatives. With Arcadium, don’t hesitate to create multiple versions of the design (save separate files or duplicate the project) to explore different layouts or styles. For instance, one version with an island vs. one with a peninsula, or a version with two wall ovens vs. one range. Because the tool is quick and allows cloning of projects, you can generate these options efficiently and present them side-by-side. This ability to iterate rapidly is a huge advantage over traditional CAD or hand-drafting where making major changes is laborious.
Parametric Customization for Custom Builds:
If you are a contractor planning to build custom cabinets or features, Arcadium’s parametric modeling lets you virtually “build” them to exact specs. Want to test a custom 40-inch wide pantry cabinet with pull-outs? Stretch a default cabinet to 40” and see how it looks and fits. The software will adjust doors and shelves, but you can note how many shelves etc., and use that as a plan for the actual carpentry. Essentially, Arcadium can act as a visual shop drawing tool – far simpler than having to sketch things on paper. Some professionals even use it to extract rough dimensions for cutting materials since it’s quicker to model and measure in 3D.
Client Collaboration and Modifications:
One of the best in class features of Arcadium 3D is how easy it makes client collaboration. As a designer, you can invite your client into the design process by sharing the 3D model link. A contractor might do the same with a homeowner to confirm details (“Does this layout of the pantry shelving meet your needs?”). Clients can view and even interact with the model on their own time, which means they come to meetings with a clearer understanding. Occasionally, clients might suggest their own modifications after seeing the model (since Arcadium is accessible, some tech-savvy clients might tweak a copy of the model themselves to test an idea). Embrace this – it’s better to integrate client feedback in the design phase than during construction. Arcadium effectively becomes a communication tool that keeps everyone on the same page, literally visualizing the same future kitchen.
Integration of AI and Presentation Tools:
Impress stakeholders by using Arcadium’s AI visualization features. For example, after finalizing the model, use the AI render tool to create a photorealistic image of one angle of the kitchen with a single click. This can help clients who might not fully grasp the real-time render (which is slightly more schematic) to see a near-real photograph of their future kitchen. Additionally, Arcadium’s ability to generate different styles or even a watercolor artistic view can be useful in presentations or mood boards. It’s an advanced trick, but showing a client a high-quality rendering of the space you designed can secure buy-in for the project and avoid last-minute second-guessing.
Export Plans for Construction:
Don’t forget that Arcadium can produce 2D plans and elevation drawings from your model. While these might not replace formal blueprints, they can serve as very handy references on site. You might print out the top-down floor plan with measurements (Arcadium likely labels lengths of walls and perhaps cabinet sizes) as a quick cheat-sheet for your install crew. For instance, an electrician can glance at the printed plan to confirm where an outlet for the refrigerator should go, because it’s right there in the model. This bridges the gap between the digital plan and physical execution.
By utilizing these advanced tips, professional designers and contractors can make Arcadium 3D an integral part of their kitchen remodeling projects. It’s not just a toy or a basic planner – it’s a robust platform that, when used to its full potential, can save time, improve accuracy, and enhance client satisfaction throughout a project.
Conclusion
Embarking on a kitchen remodel is a journey of imagination, planning, and execution – and with Arcadium 3D’s online design tool, that journey becomes both accessible and richly detailed. We’ve walked through how you can plan your kitchen remodel step by step using a 3D design platform, from the initial floor plan outline to the finishing touches of lighting and decor.
Along the way, we highlighted how Arcadium 3D empowers anyone to create a functional, beautiful kitchen design with confidence, whether you’re a homeowner trying this for the first time or a veteran contractor looking to streamline your workflow.
By embracing a digital design approach, you’re effectively bridging the gap between vision and reality. The 3D model you create is more than just a picture – it’s a blueprint for transformation. It ensures that when hammers start swinging and cabinets arrive on site, everything fits as intended and the end result matches the dream you’ve been refining on screen.
Check Out Our Tool


 Color palette generator
 Floor plan creator
 Interior design app
 Kitchen design tool
 House design software
 Landscape design software
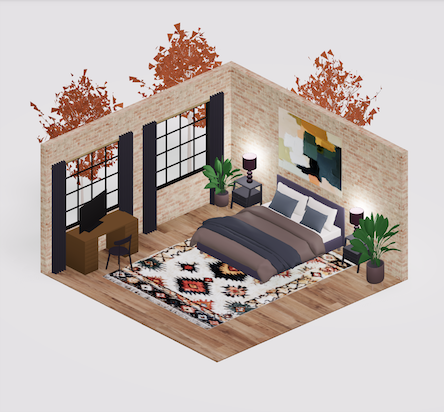
 Bedroom design
 Office floor plan creator
 How to use Arcadium — full guide
 3D object library - free
 Articles and blog
.png)