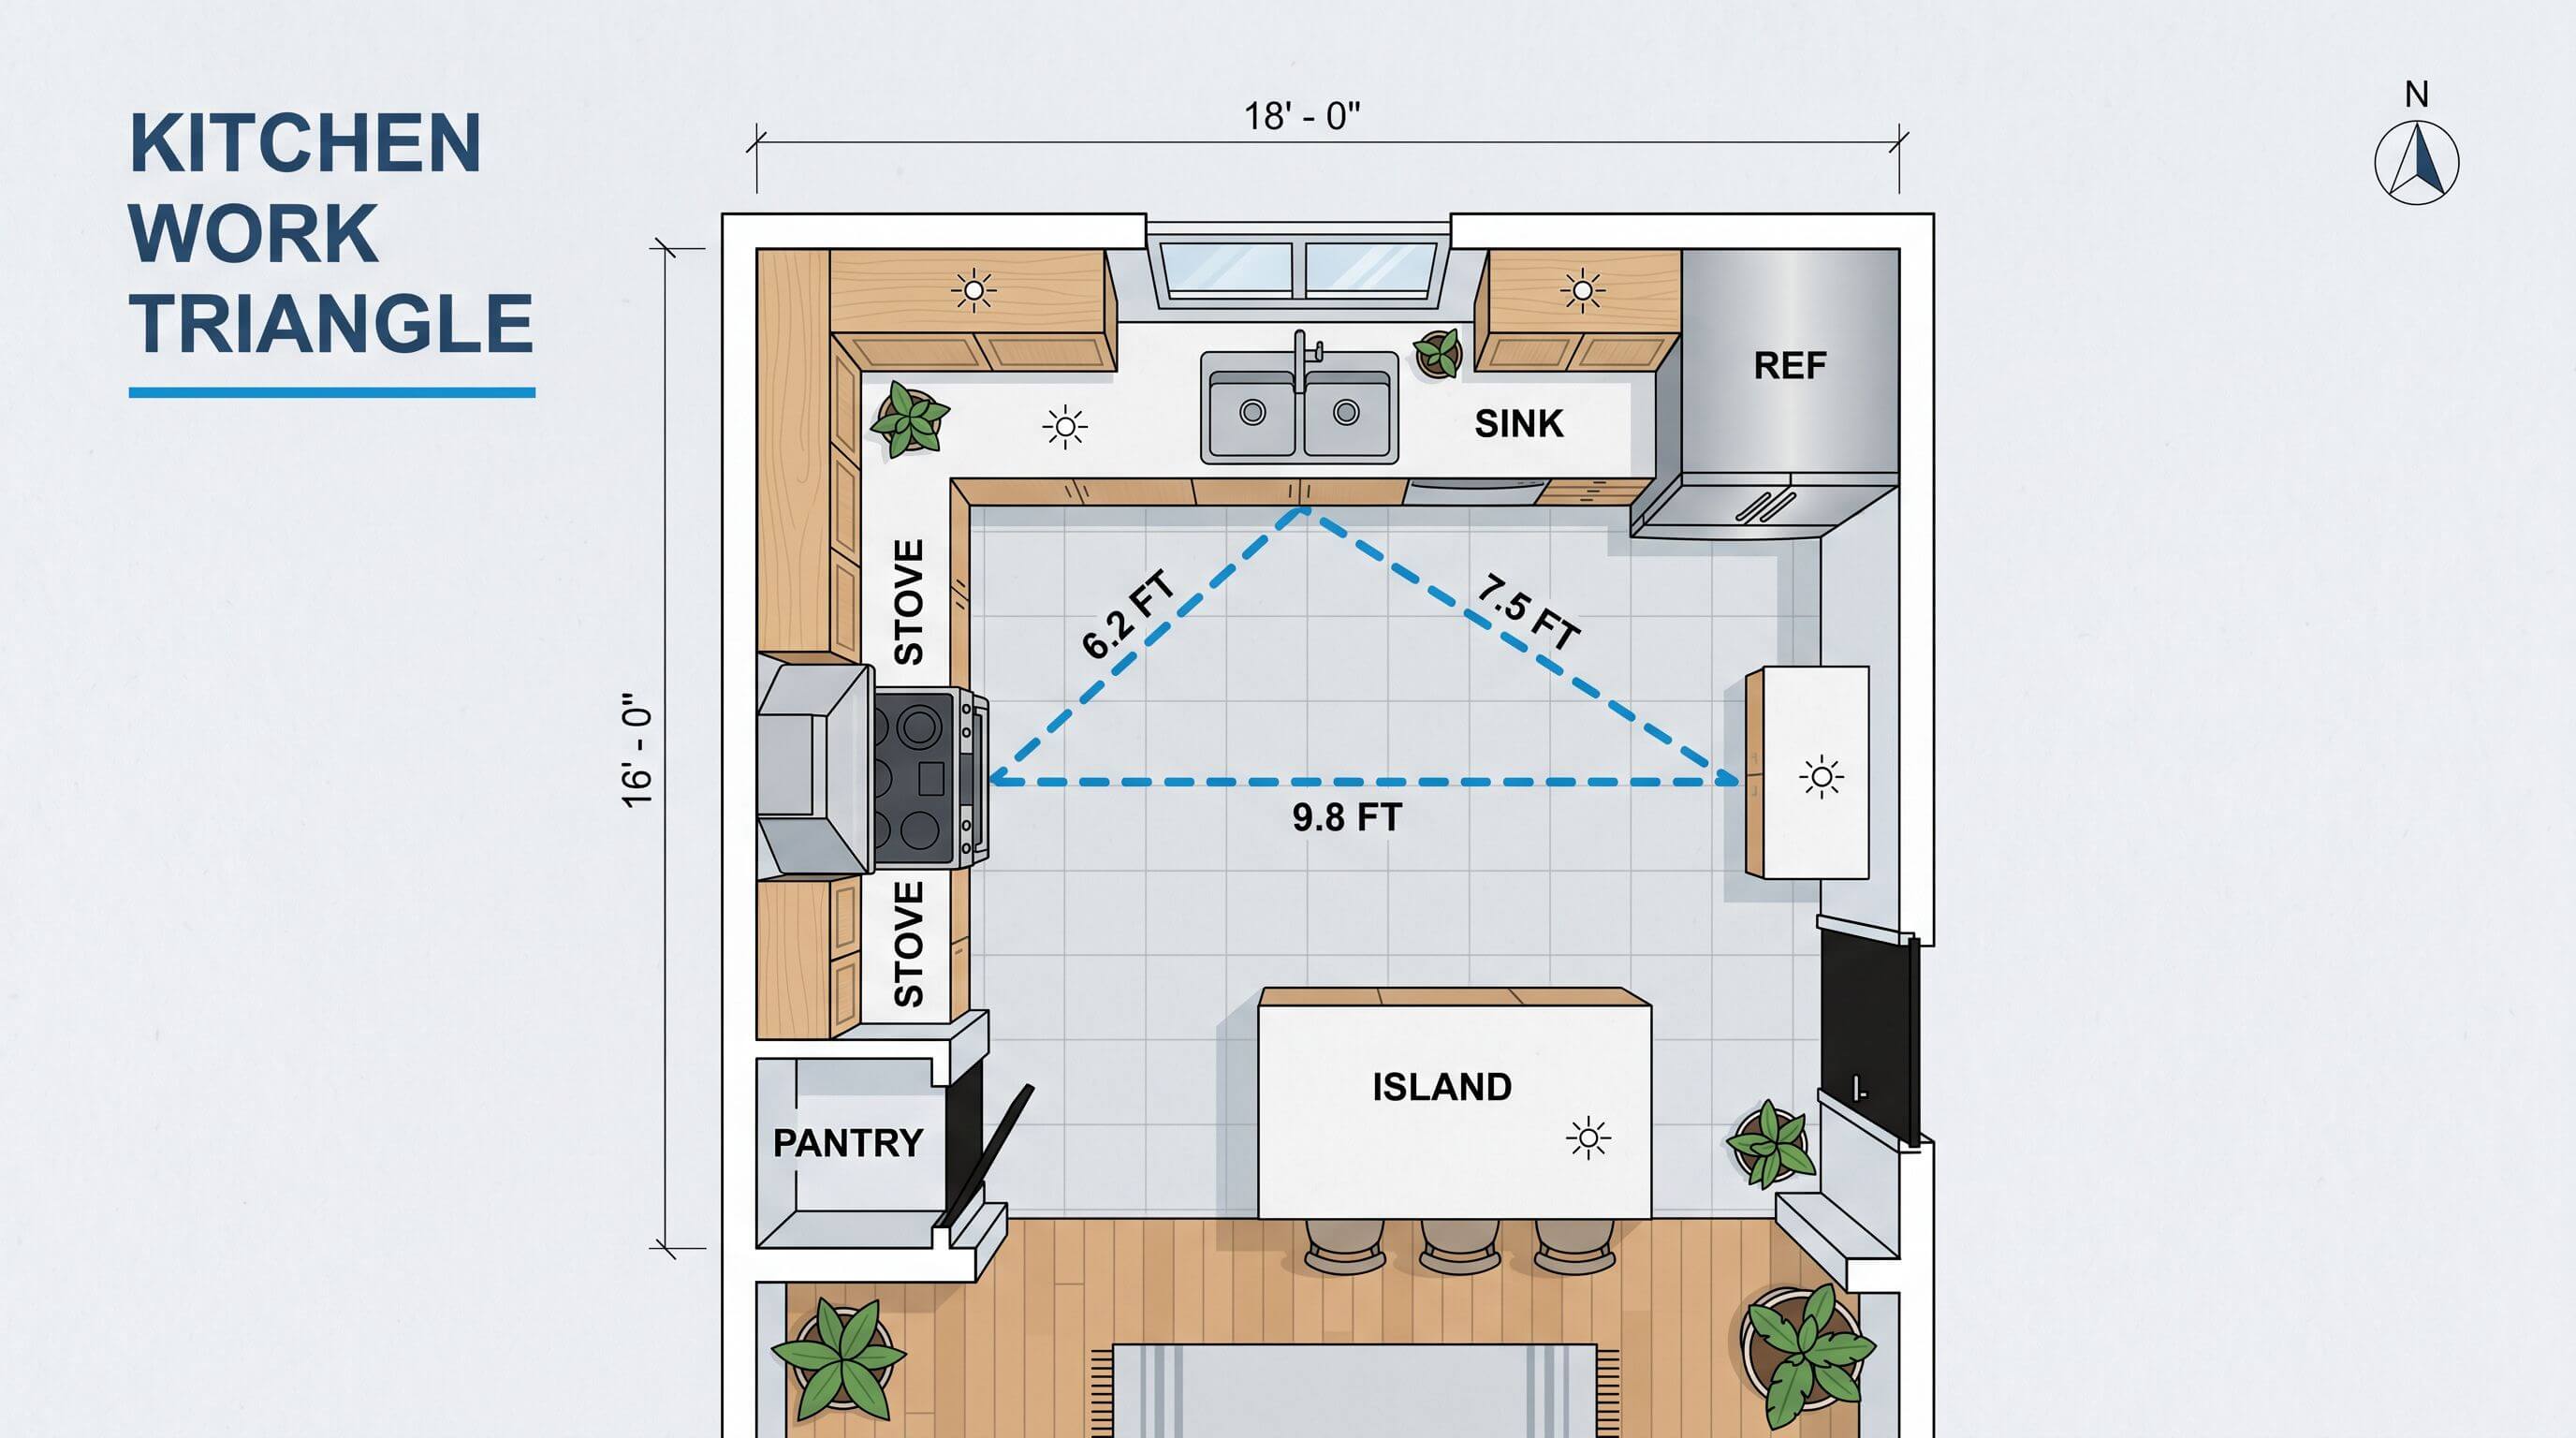
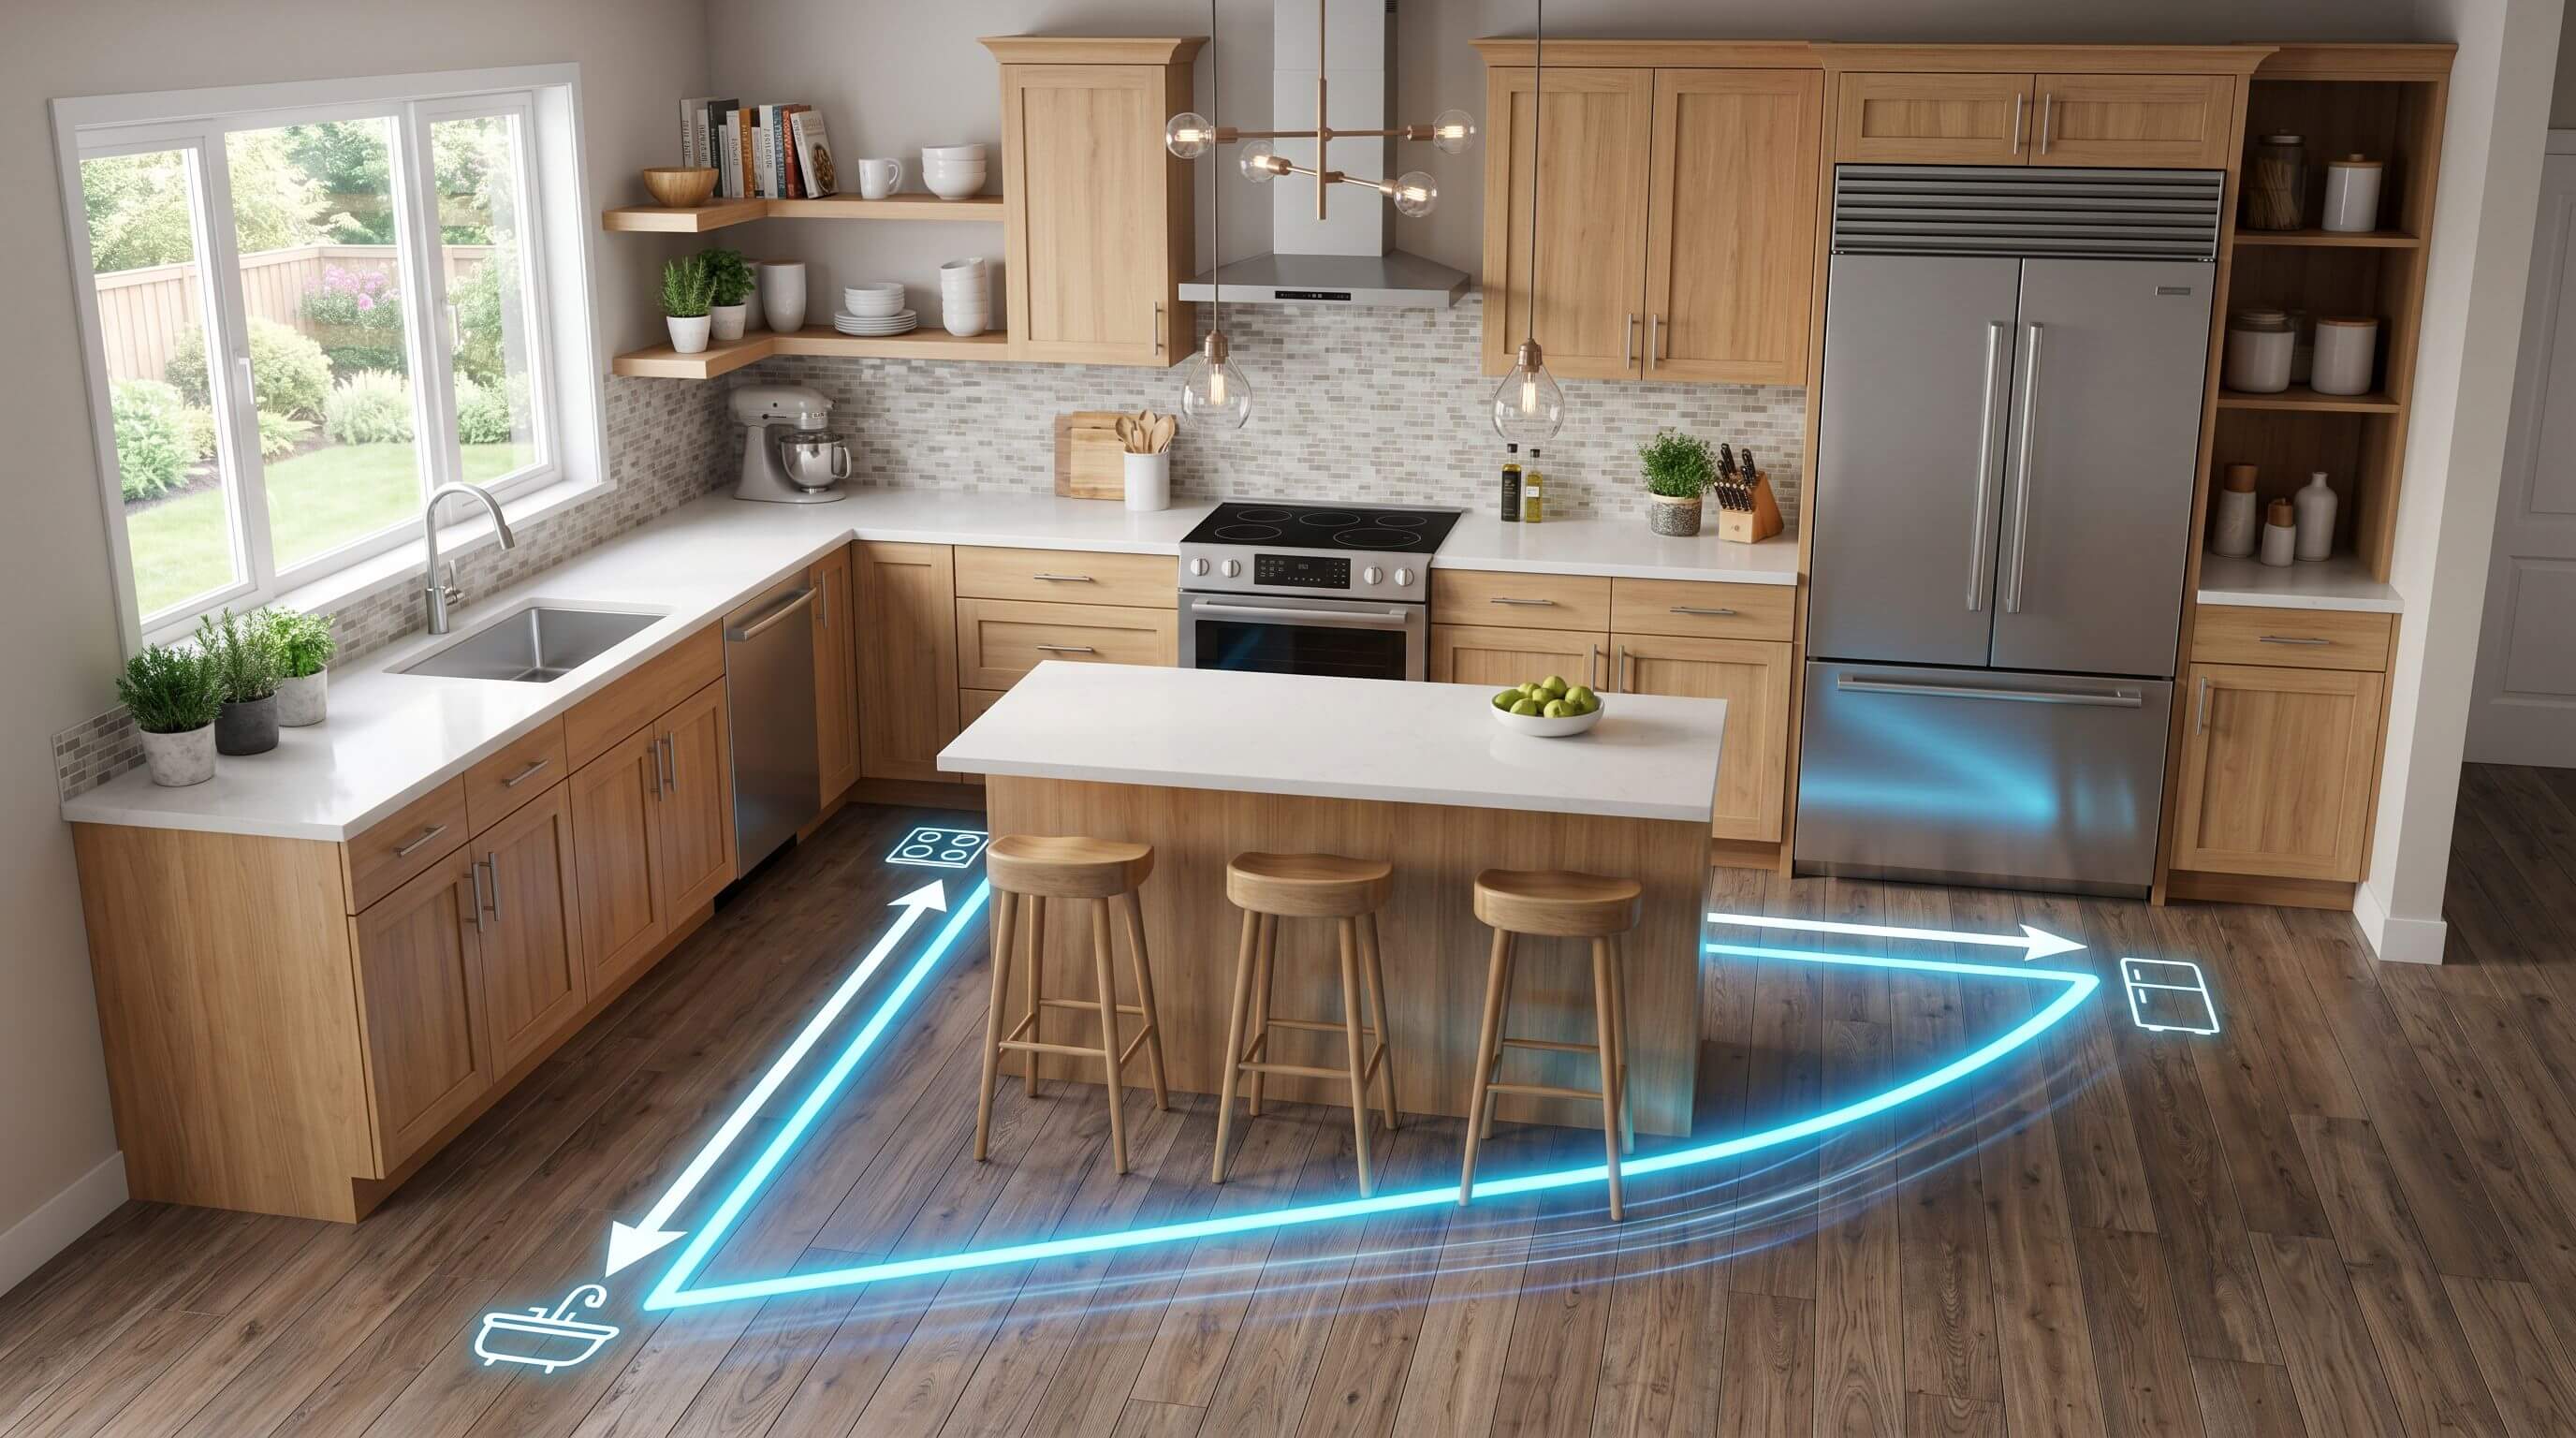
The kitchen work triangle is a design guideline that links three core work areas, the sink, stove, and refrigerator, into one efficient loop. Each leg should measure 4 to 9 feet, with a total perimeter between 13 and 26 feet. Done right, this layout cuts wasted steps and makes daily cooking faster.
The idea has shaped kitchen design for nearly a century, and it still anchors how professionals plan a room today. Arcadium 3D works with this principle every day, because a good triangle is the difference between a kitchen that flows and one that fights you. Below, you get the rules, real numbers, and five layout examples you can copy.
What is the kitchen work triangle?
The kitchen work triangle is the imaginary triangle formed by your three busiest stations: the sink, the cooktop, and the refrigerator. These are the points you move between most while cooking, so keeping them close trims the distance you walk.
The concept is also called the golden triangle. Industrial engineer Lillian Moller Gilbreth pioneered the thinking in the 1920s, and the "work triangle" name took hold in the 1940s. Kitchens were small and single-cook back then, and the triangle solved a real movement problem.
The principle survives because human movement has not changed. You still carry food from the fridge, prep and rinse at the sink, then cook at the stove. A tight loop between those three points saves steps on every meal.
The work triangle rules and dimensions
Each side of the triangle should sit between 4 and 9 feet, and the three sides added together should total 13 to 26 feet. Anything shorter feels cramped, and anything longer adds steps you do not want.
These figures come from the National Kitchen & Bath Association guidelines, which most designers follow. A few extra rules keep the triangle clean:
Keep a clear landing counter beside each point. A fridge with no counter next to it forces you to turn and twist with a full armload, which the triangle is meant to prevent.
A real example with numbers
Gilbreth proved the payoff with strawberry shortcake. At a 1929 exposition, she made the dessert twice, first in a scattered 1920s kitchen and then in her own planned L-shaped layout.
The disorganized kitchen took 281 steps to finish the dish. Her efficient layout brought the same task down to 45 steps. That is an 84% cut in walking for a single recipe.
The lesson holds today. Shorter paths between sink, stove, and fridge compound across every meal, every day, for years.
Five layout examples that fit the triangle
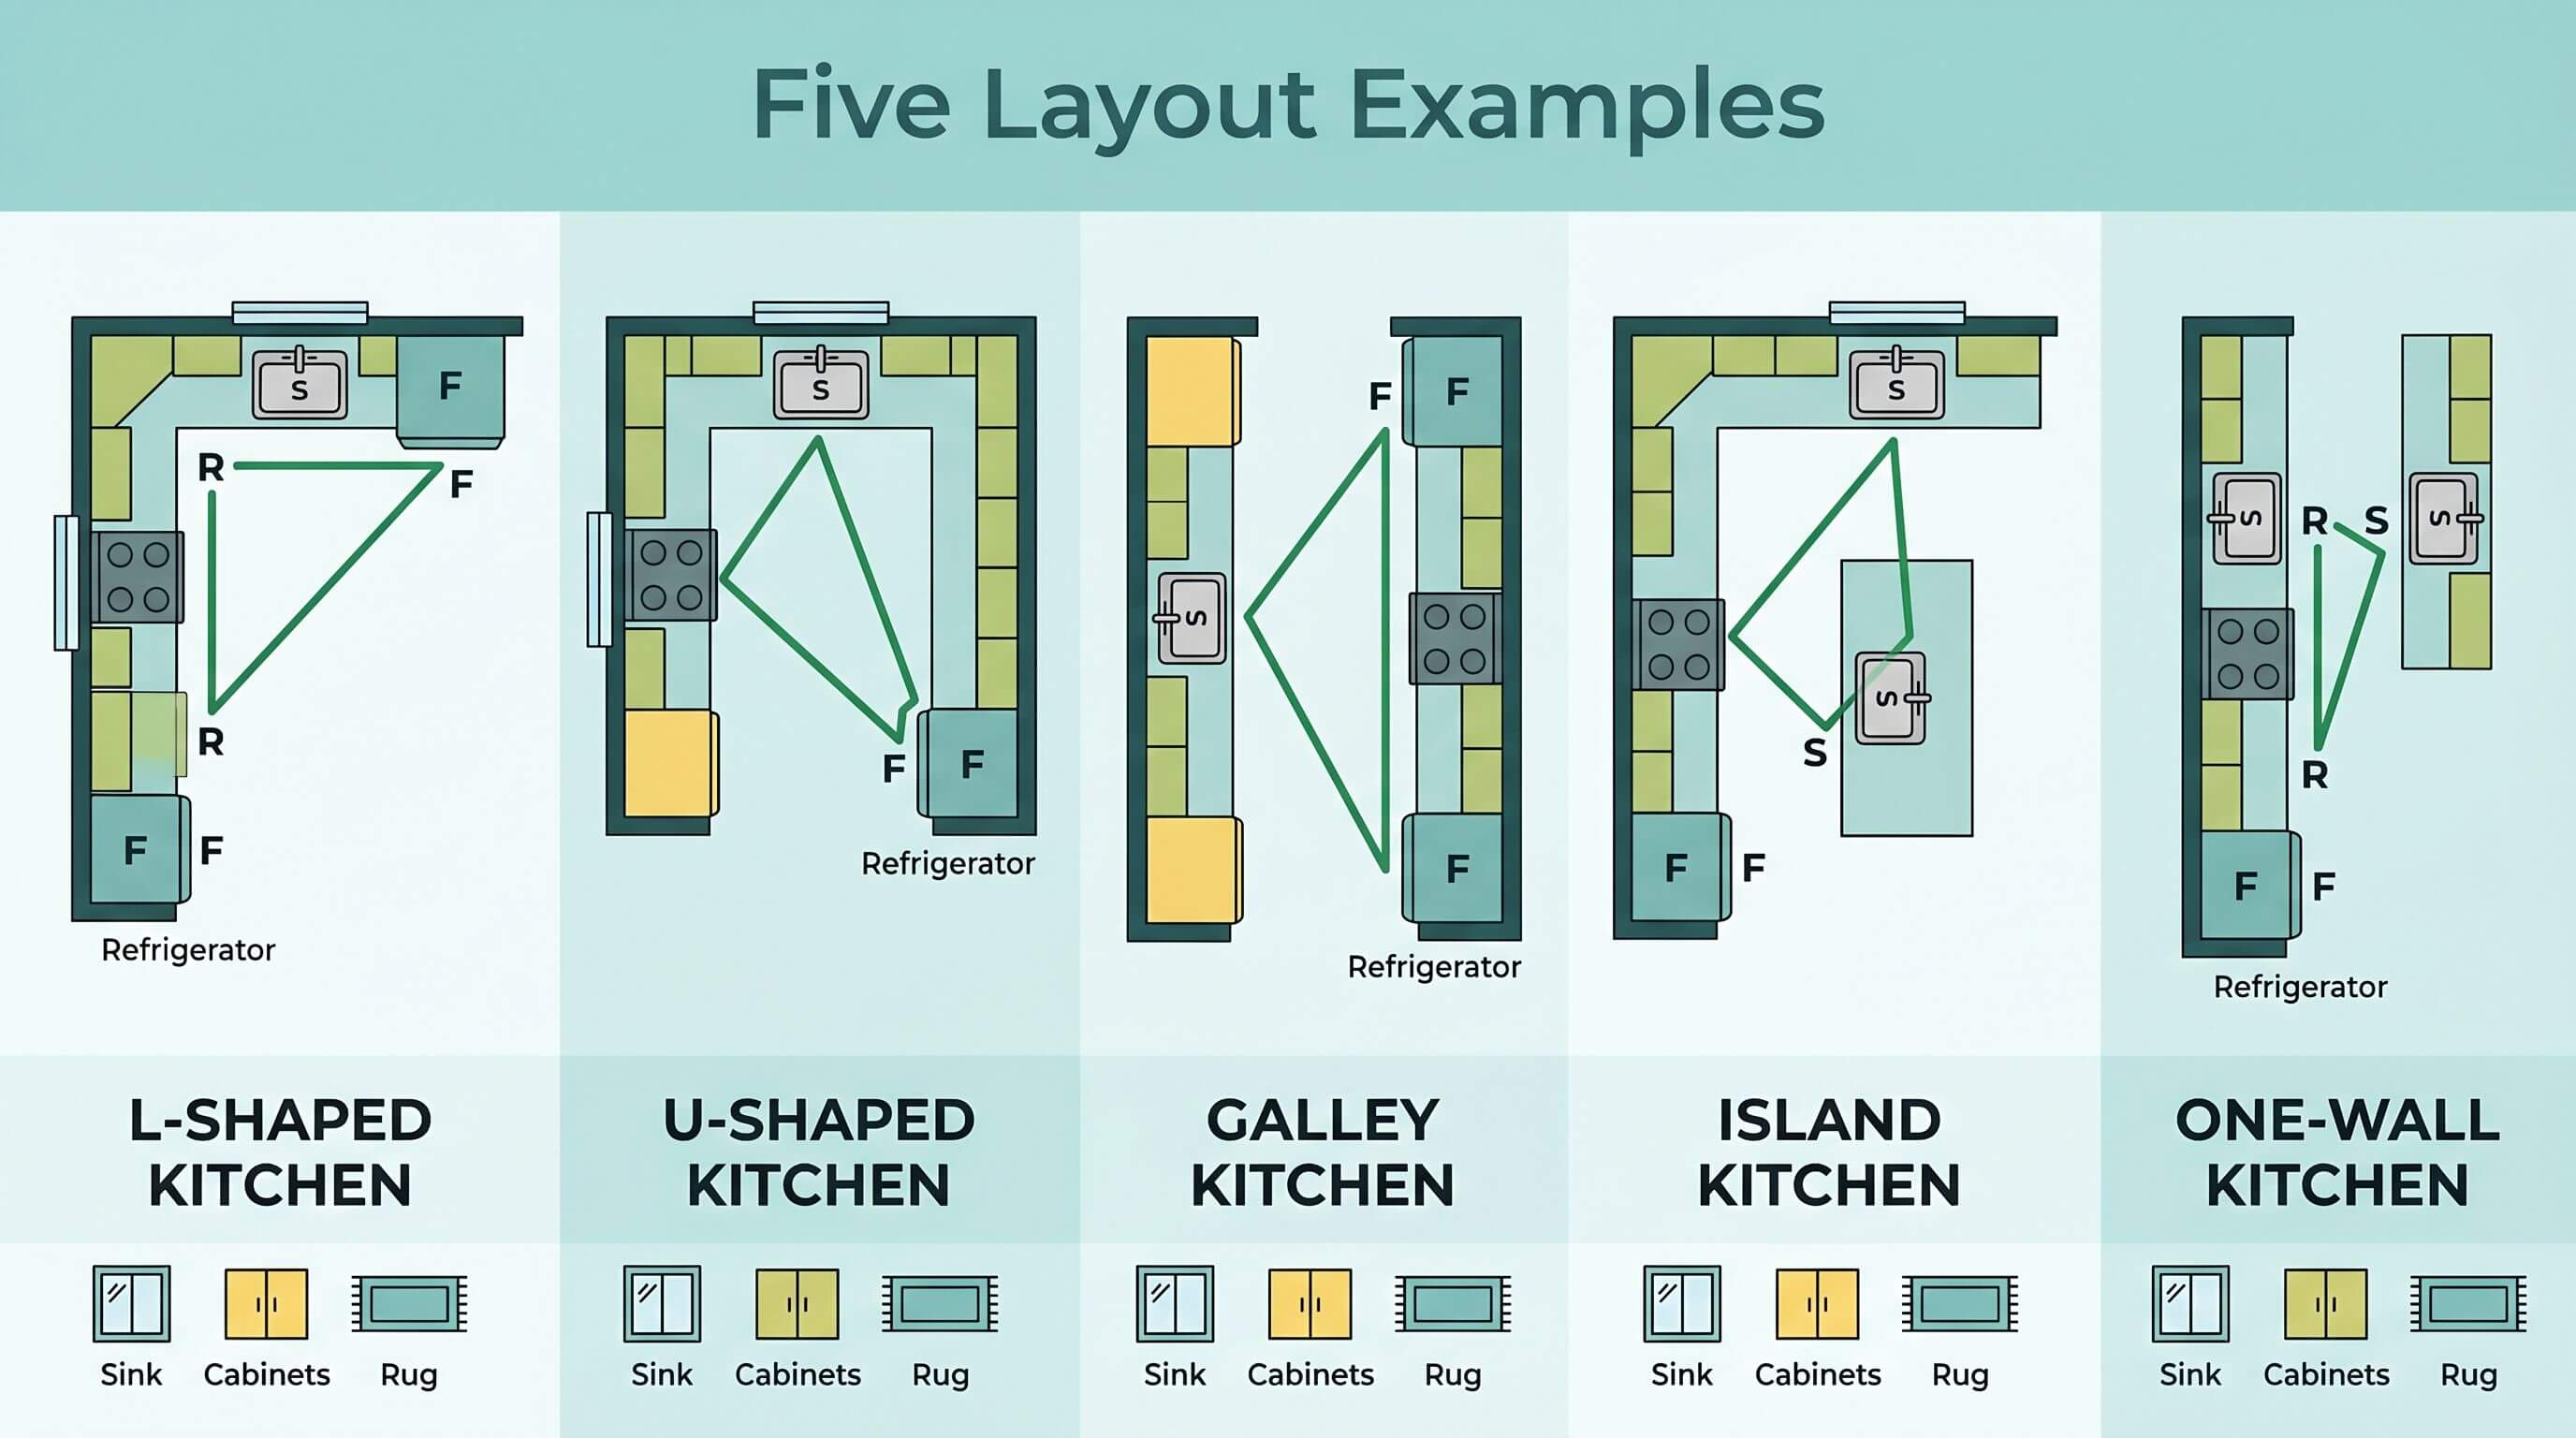
The triangle adapts to most kitchen shapes. Here is how it lands in the five common ones.
1. L-shaped kitchen: Two connected walls form an L, and the three points spread naturally across them. Put the fridge at one end, the stove near the other, and the sink between them. This is the layout Gilbreth used, and it remains a favorite.
2. U-shaped kitchen: Three walls give one point per wall, which creates a near-perfect triangle. Counter space is generous, so a U-shape suits serious cooks who want everything in reach.
3. Galley kitchen: Two parallel runs face each other. Place the sink and stove on one run and the fridge on the other, so the triangle crosses the aisle. A galley works best when it is closed at one end, so no one walks through the cook's path.
4. Island kitchen: Move one point, usually the sink or cooktop, onto the island. The island becomes a triang corner instead of an obstacle. Keep at least 42 inches of aisle around it.
5. One-wall kitchen: A single wall cannot form a true triangle. Use a straight-line workflow instead, with the sink in the middle and the fridge and stove on either side. Efficiency still comes from smart spacing.
For floor plans and dimensions you can adapt to your room, see Arcadium 3D's kitchen layout planner.
Is the triangle outdated? The modern zone approach
The triangle was built for one cook, and many kitchens now host two or more. Designers answer this with work zones, grouping the room into prep, cooking, cleaning, and storage areas.
Zones do not replace the triangle. They wrap around it. A common upgrade adds a second triangle, often by putting a prep sink on the island so a second cook gets their own short loop.
Modern appliances also pull on the layout. Microwaves, coffee machines, and air fryers each need a home and a plug. Map those into the zones around your triangle, not inside the path itself.
How to plan and test your own triangle
Start by marking your three points on a scale floor plan. Measure each leg, then add the three legs together and check both numbers against the 4–9 ft and 13–26 ft targets.
Walk the path before you commit. A plan that reads fine on paper can hide a cabinet door that blocks the fridge or an island corner that clips the route. Testing the loop in a 3D model catches these clashes before the cabinets are ordered.
Adjust one point at a time. Moving the sink a foot often fixes a leg that runs too long without disturbing the rest of the room.
Conclusion
The kitchen work triangle remains the fastest way to plan a kitchen that feels effortless to cook in. Hold each leg to 4–9 feet, keep the perimeter under 26, and leave the path clear of traffic and obstacles. Then layer in zones for extra cooks and gadgets.
Ready to see your triangle before you build it? Map your sink, stove, and fridge in Arcadium 3D, walk the layout in 3D, and fix the flow while changes are still free.
Frequently asked questions
Is the kitchen work triangle still relevant?
Yes, the triangle still guides efficient kitchen design, especially in smaller and single-cook kitchens. In larger or open-plan rooms, designers blend it with work zones for more flexibility. The core idea, keeping sink, stove, and fridge close, stays useful because human movement has not changed.
What are the ideal kitchen work triangle dimensions?
Each leg of the triangle should measure 4 to 9 feet, and the three legs together should total 13 to 26 feet. Legs shorter than 4 feet feel cramped, and legs longer than 9 feet add wasted steps. These figures follow standard NKBA design guidelines.
What is the golden triangle in a kitchen?
The golden triangle is another name for the work triangle. It refers to placing the sink, stove, and refrigerator at three points of a triangle to shorten the path between them. The goal is fewer steps and smoother movement during cooking and cleanup.
Does the work triangle work in galley or one-wall kitchens?
A galley kitchen forms the triangle across the aisle, with the sink and stove on one run and the fridge on the other. A one-wall kitchen cannot make a true triangle, so it uses a straight-line workflow instead, with the sink placed between the fridge and stove for balance.
Where should the dishwasher go in the work triangle?
Place the dishwasher right next to the sink, inside the cleaning zone. This keeps rinsing and loading in one spot and avoids adding a fourth point to the triangle. Dishwasher drawers help in tight layouts where a full unit would block a leg.


 Color palette generator
 Floor plan creator
 Interior design app
 Kitchen design tool
 House design software
 Landscape design software
 Bedroom design
 Office floor plan creator
 How to use Arcadium — full guide
 3D object library - free
 Articles and blog